Free Stuff Motivates Me Link to heading
I’ll admit it. Anytime I see a challenge where one can win free schwag I dive into it head first. When I saw that one could win a free t-shirt by completing the Hurricane Electric IPv6 Certification course , I became dead set on getting my hands on a new shirt. Little did I know it would not only be fun and re-teach me some concepts, but also give me motivation on testing IPv6 within Openstack. This isn’t going to be a primer on IPv6 so, if needed, go to the Wikipedia article to brush up concepts beforehand. So let’s get into how to complete the certification.
Requirements Link to heading
The certification challenge tests your ability to implement IPv6 for the following: -
- Client
- Web server
- Email server
- DNS
The only things you will need to do this are:
- Laptop - Linux, MacOSX, or Windows (Linux is the easiest IMHO)
- A domain name ($2.99 .info domain at GoDaddy works fine)
- An IPv6 tunnel if IPv6 isn’t provided by your ISP (more on that later)
- An email server
- An authoritative name server
Once you have all of this, you are ready to register.
Newbie Link to heading
First, register at the Hurricane Electric(HE) IPv6 certification site. Once you’ve created your account you’ll answer a few v6 related multiple choice questions. After you’ve completed the questions, you’ll be a certified “Newbie”.
Explorer Link to heading
The test will now check to see if you are connecting with an IPv6 address. If your current ISP is not issuing IPv6 addresses, then your next option is to sign up for a free IPv6 tunnel through Hurricane Electric here. This is a free tunnel broker service that enables you to reach the IPv6 Internet by tunneling over existing IPv4 connections. The instructions for each specific OS/platform are very straight forward. Once completed, verify connectivity with the ping6 command:
dchamorro@fromthedepths:~$ ping6 ipv6.google.com
PING ipv6.google.com(dfw06s26-in-x08.1e100.net) 56 data bytes
64 bytes from dfw06s26-in-x08.1e100.net: icmp_seq=1 ttl=55 time=107 ms
64 bytes from dfw06s26-in-x08.1e100.net: icmp_seq=2 ttl=55 time=107 ms
64 bytes from dfw06s26-in-x08.1e100.net: icmp_seq=3 ttl=55 time=106 ms
64 bytes from dfw06s26-in-x08.1e100.net: icmp_seq=4 ttl=55 time=107 ms
^C
--- ipv6.google.com ping statistics ---
4 packets transmitted, 4 received, 0% packet loss, time 3005ms
rtt min/avg/max/mdev = 106.984/107.049/107.091/0.235 ms
Go back to the test and it will detect that you are connected via IPV6 and give you the title of “Explorer”
****** A big caveat that I found is that my current ISP did not provide me with an IPv6-capable modem. I tried for a while to setup the HE tunnel service but could not get the tunnel successfully established. After further research I found my ISP, as well as several others block protocol 41, which is used in 6in4 tunneling. I ended up using a VPS for the rest of the test until I could get my new modem installed. If this happens to you I can suggest using the Gogo6 client and broker service ******
Enthusiast Link to heading
Step 1: In this part, you’ll need to show that you can setup a webserver that responds to IPv6 as well as it’s AAAA name record. If you are using a Debian-based Linux system, then this is a breeze. First, we install Apache:
sudo apt-get update sudo apt-get install apache2
Once installed, you have to set your Apache configuration to listen to your IPv6 interface:
sudo vim /etc/apache2/apache2.conf
Add the following:
Listen [your IPv6 address in these brackets]:80
As an example, this is my config:
Listen [2001:470:1f10:950::2]:80
It’s important that you keep the brackets in place. Once completed, restart Apache:
sudo service apache2 restart
Step 2: Register a domain on GoDaddy.com. Why GoDaddy you say? Because they are fully IPv6-compliant and easy to setup. Any name will do but the .info domains are the cheapest ($2.99). Once you’ve registered a name, launch your domain console:

Click the drop down menu next to your domain name and select “Set Nameservers”:
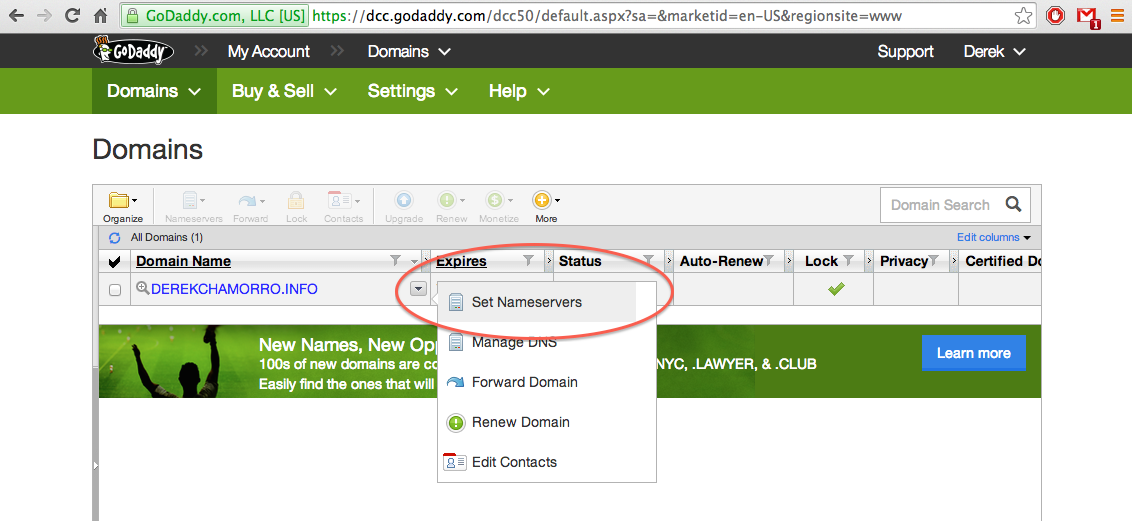
And set the nameservers to the following HE NS servers:

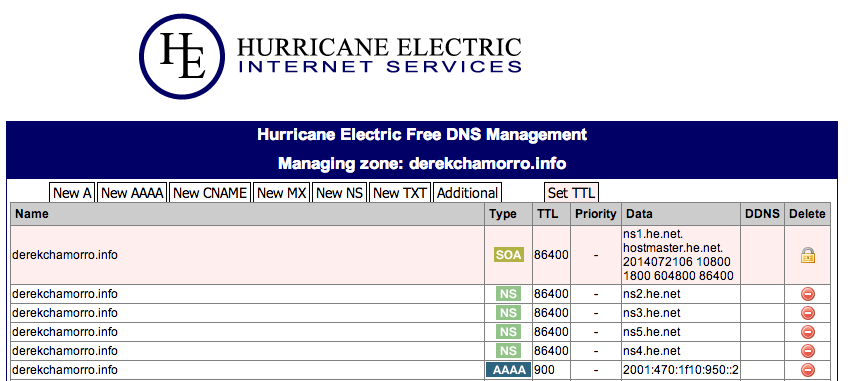
It will take a bit for DNS to propagate. While you wait for DNS to change, log into Hurricane Electric DNS at dns.he.net with the same credentials you used for the Tunnel Broker site.
On the left hand side click “Add Domain” and add your domain:

Click on the “Edit Zone” button next to your domain name and click on the “New AAAA” tab. Here you will put in ** your own IPv6 host address** (not mine please!) along with the following:

Once completed, your page should look like this:
While we wait again for DNS to update we can go to the actual test. Hurricane Electric will generate a randomly generated file name (asfierv.txt for example). You have to create a dummy file on your server and put in the web root directory:
sudo vim /var/www/html/asfierv.txt ## as an example
Click test and HE will grab the file. If you get an error, check that you do not have ip6tables enabled or, if enabled, allow port 80 inbound:
sudo ip6tabes -A INPUT --p tcp -m state --state NEW -m tcp --dport 80 -j ACCEPT
Recheck the test and see if HE grabed the file off the webserver. When successful, you’ll be given the Enthusiast title.
Administrator Link to heading
To achieve the Administrator title, you’ll need to do the following:
- Setup a basic SMTP server
- Create an MX record on dns.he.net
- Send a test email from HE to your email server
- Check your email and apply the code sent on the certification site
This is super simple if using Ubuntu. First, install Postfix:
sudo apt-get install postfix
Edit the /etc/postfix/main.cf file and make the following changes (use your domain info):
#myhostname = host.domain.tld
#myhostname = virtual.domain.tld
myhostname = mx.derekchamorro.info

#mydomain = domain.tld
mydomain = derekchamorro.info
mydestination = $myhostname, localhost.$mydomain, localhost, $mydomain,

inet_protocols = ipv6
inet_interfaces = all
Restart Postfix:
sudo service postfix restart
And test that you can connect to your SMTP server:
telnet localhost 25
If you see connected to host then you are good to go.
******** If you are behind a home router then be sure you are port forwarding SMTP traffic to your host computer ******
Now that the SMTP server is setup we’ll need to create the MX record. Log into dns.he.net again, click on the edit domain button again, and this time click on the “New MX” tab and enter the following (with your own domain info):

You should now see an MX record in your zone:

Now that we have a swanky MX record, we can ask HE to email our domain, but first let’s get a super simple mail client:
sudo apt-get install bsd-mailx
Now we can have HE send the email:
- Type in whoami in your terminal to get your user info.
- Navigate to ipv6.he.net and login.
- Enter your username@yourdomain.com (in my case it was dchamorro@dchamorro.info)
- Click Send It!
In your terminal check your email with the following:
mailx
You should see an email like the following:
N 1 ipv6@he.net Sun Aug 3 19:41 26/893 "IPv6 Certification Administrator Mail Test"
Open the email by pressing 1 and you’ll see the activation code. Paste the code back into the field below where you sent the email, answer a couple of IPv6 questions, and you’ll be bestowed the title of Administrator. Whew.
Professional Link to heading
To achieve this level, you have to ensure your mail server has reverse DNS records (PTR) that work over IPv6. Login to dns.he.net and click Add a new reverse on the left hand side. Paste either the /64 Routed IPv6 Prefix from the Tunnelbroker site or the /64 assigned by your ISP. The example below is from the HE Tunnelbroker site (with my IP’s removed):

Click Create and you are done adding a reverse.
Click on the “Additional” tab on top, select “New PTR” and add your FQDN information:
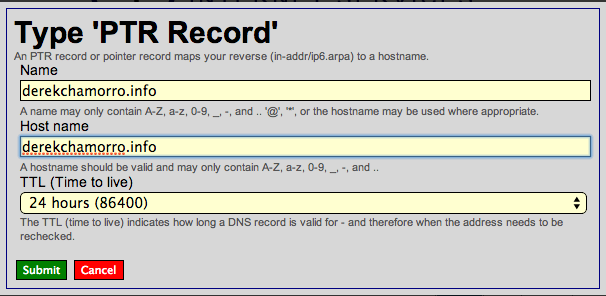
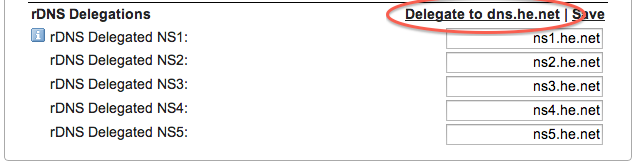
Finally click Submit. Before you have HE check your records, make sure you have delegated your reverse DNS to HE. Login to the Tunnelbroker site, select your tunnel, and go to rDNS Delegations and select Edit. Make sure the following is input:
Once completed, navigate to your certification page and click the link on the bottom to have them check your PTR records. You are now an IPv6 Professional!
Guru Link to heading
The next step only requires a harder questionnaire before you are given the title Guru. Super easy.
Sage Link to heading
This last task is to verify that IPv6 glue records for your domain exist with your Registrar. If you signed up with GoDaddy then you are all set. Answer the final questionnaire (which does take some thought) and you are given the title of IPv6 Sage:
Verify your address to correct and a free IPv6 Sage shirt will be shipped to your door (take 4-6 weeks apparently…ugh)
Conclusion Link to heading
Setting up IPv6 functionality is surprisingly simple, even if your provider does not supply you with IPv6 space. Many of the major sites support IPv6 with more on the way. Hopefully this will motivate more people to start playing around with IPv6 to see how easy it really is. Now….off to enable IPv6 within Openstack…